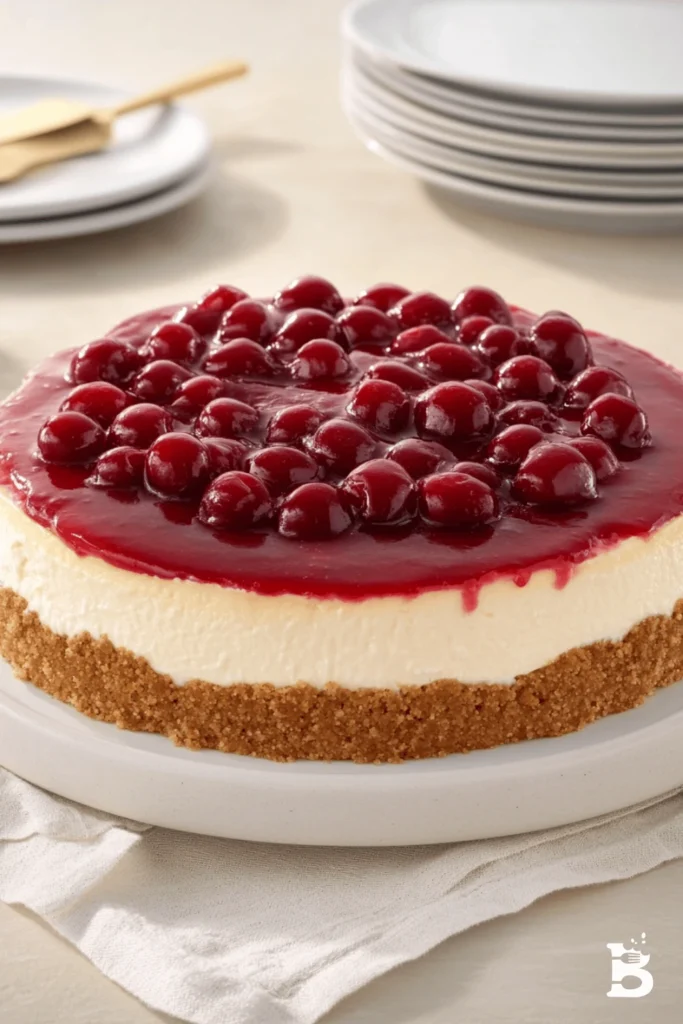
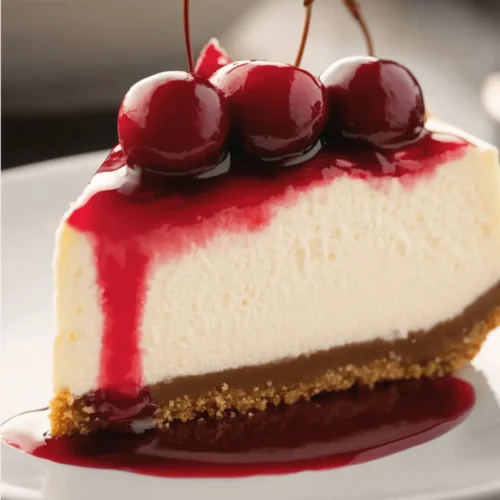
If you’re a fan of creamy, rich, and decadent desserts, then cherry cheesecake is a must-try. This classic treat combines a buttery graham cracker crust, smooth and velvety cheesecake filling, and a luscious cherry topping that perfectly balances sweetness and tartness. Whether you’re making it for a special occasion, a holiday gathering, or satisfying your sweet cravings, this cherry cheesecake recipe is guaranteed to impress.
This guide covers everything you need to know about making the perfect cherry cheesecake, from the essential ingredients and step-by-step instructions to expert tips, storage options, and variations. By the end of this article, you’ll have all the knowledge you need to make a flawless cheesecake that rivals any bakery version.
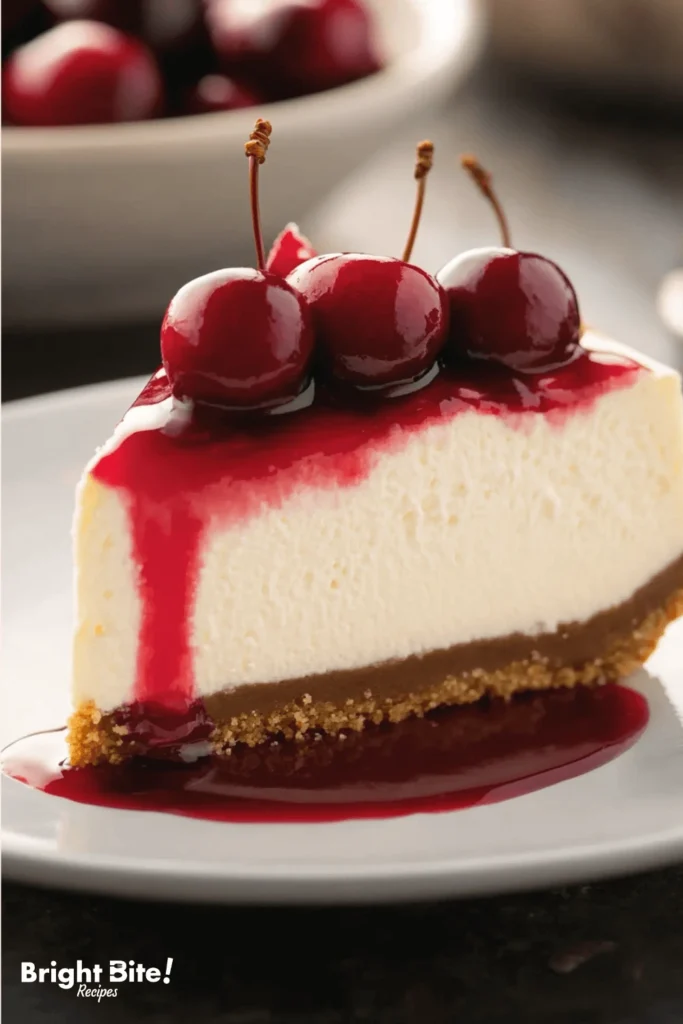
Table of Contents
Why You’ll Love This Recipe
Cherry cheesecake is a beloved dessert for many reasons, and this recipe stands out for its simplicity and unbeatable taste. Here’s why you’ll love making and eating this cheesecake:
- Classic Flavor Combination: The contrast of sweet, creamy cheesecake and tart cherry topping is irresistible.
- Easy to Make: This recipe is approachable for beginners and experienced bakers, with simple ingredients and clear instructions.
- Perfect for Any Occasion: Whether for holidays, birthdays, or casual gatherings, cherry cheesecake always makes a great dessert.
- Customizable: You can tweak the recipe using different crusts, flavors, and toppings.
- Make-Ahead Friendly: This cheesecake tastes better after chilling overnight, making it a stress-free dessert option.
Detailed Ingredients and Instructions
Step 1: Making the Perfect Crust
A good cheesecake starts with a solid crust. The graham cracker base should be buttery, slightly sweet, and firm enough to hold the cheesecake together.
- Tip: Press the crust mixture firmly into the pan using the back of a spoon or the bottom of a measuring cup for an even layer.
- Alternative Crust Options: You can swap graham crackers for crushed Oreos, digestive biscuits, or even vanilla wafers for a different flavor twist.
Step 2: Preparing the Creamy Cheesecake Filling
- Use Room Temperature Ingredients: This ensures a smooth and lump-free batter.
- Mixing Technique: Avoid overmixing to prevent too much air from being incorporated, which can cause cracks.
Step 3: Baking to Perfection
- Water Bath Method: For an ultra-smooth texture and to prevent cracking, bake the cheesecake in a water bath by placing the springform pan in a larger pan filled with hot water.
- Checking for Doneness: The cheesecake should have a slight jiggle in the center but should be mostly set.
Step 4: The Cooling Process
- Gradual Cooling: Let the cheesecake cool inside the oven with the door open before transferring it to the fridge.
Step 5: The Cherry Topping
- Using Fresh vs. Canned Cherries: Fresh cherries provide a brighter flavor, but canned cherries work well when fresh ones aren’t in season.
Tips, Variations, and Storage Options
Pro Tips
- Prevent Cracking: Avoid overbaking and cool the cheesecake gradually.
- Chilling is Key: The flavors and texture improve with at least 4 hours of refrigeration.
Variations
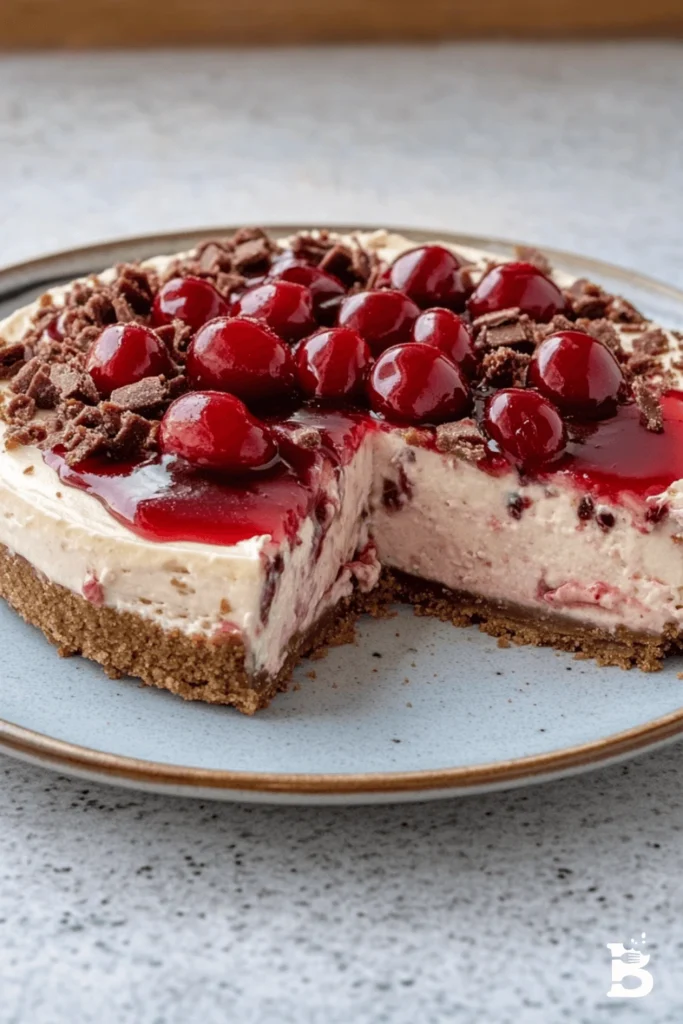
- Chocolate Cherry Cheesecake: Add a layer of melted chocolate to the crust before filling.
- No-Bake Version: Swap the baked filling for a no-bake cheesecake mixture made with whipped cream and cream cheese.
Storage and Freezing
- Refrigeration: Store in an airtight container for up to 5 days.
- Freezing: Cheesecake can be frozen (without topping) for up to 3 months. Thaw overnight in the fridge before serving.
Equipment Needed
You’ll need a few essential kitchen tools to make the best cherry cheesecake. Here’s a list of the must-have equipment to ensure a smooth baking process:
1. Springform Pan
- A 9-inch springform pan is the best choice for cheesecake. It allows you to remove the cheesecake easily without damaging the crust or filling.
- Alternative: If you don’t have a springform pan, you can use a deep pie dish or a regular cake pan lined with parchment paper, but serving might be trickier.
2. Mixing Bowls
- You’ll need at least two mixing bowls—one for the crust and another for the filling.
- Glass or stainless steel bowls are best for preventing unwanted flavors from affecting your ingredients.
3. Electric Mixer or Stand Mixer
- A hand or stand mixer helps achieve a smooth and lump-free cheesecake filling.
- If mixing by hand, use a sturdy whisk and make sure all ingredients are at room temperature for easier blending.
4. Rubber Spatula and Whisk
- A rubber spatula is great for scraping down the sides of the mixing bowl, ensuring all ingredients are well combined.
- A whisk is useful for gently incorporating ingredients without overmixing.
5. Baking Sheet and Aluminum Foil
- If using a water bath method, wrap the bottom of the springform pan in aluminum foil to prevent leaks.
- Placing the pan on a baking sheet helps stabilize it in the oven.
The right equipment makes the cheesecake-making process easier and ensures a professional-quality dessert.

Related Recipes
If you love cherry cheesecake, you might also enjoy these delicious desserts:
1. Classic New York Cheesecake
- A rich and creamy cheesecake with a dense texture and no topping. Perfect for purists who love the cheesecake flavor on its own.
2. No-Bake Cheesecake
- A light and airy cheesecake that requires no baking. It’s made with whipped cream and a cheese filling, chilled until set.
3. Chocolate Cherry Cheesecake
- A twist on the classic recipe with a chocolate cookie crust and chocolate-infused filling topped with cherries.
4. Mini Cheesecakes
- Individual-sized cheesecakes baked in muffin tins. Great for portion control and parties.
5. Strawberry Swirl Cheesecake
- A variation that features a luscious strawberry sauce swirled into the cheesecake before baking.
Try these recipes if you’re in the mood for more cheesecake goodness!
Pairing/Serving Suggestions
Cherry cheesecake is delicious, but pairing it with the right sides and drinks can elevate your dessert experience. Here are some serving ideas:
Best Drinks to Pair with Cherry Cheesecake
- Coffee: A freshly brewed cup of coffee, especially espresso or a latte, balances the sweetness of the cheesecake.
- Red Wine: A glass of Pinot Noir or Merlot pairs beautifully with the tartness of the cherries.
- Tea: A cup of black or green tea offers a light and refreshing contrast to the creamy texture.
Toppings and Garnishes
- Whipped Cream: A dollop of homemade whipped cream adds extra creaminess.
- Chocolate Shavings: Dark chocolate shavings bring a slight bitterness that complements the cherries.
- Caramel Drizzle: A drizzle of caramel sauce adds richness.
- Almond Slivers: Toasted almonds provide a nice crunch and nutty flavor.
Serving Ideas for Special Occasions
- Holiday Dessert Table: Serve alongside Christmas or Thanksgiving pies.
- Valentine’s Day Treat: Garnish with chocolate-covered cherries for a romantic touch.
- Birthday Alternative: Instead of cake, serve cheesecake with candles on top!
However you serve it, cherry cheesecake is always a show-stopping dessert.
Creative Ways to Serve Cherry Cheesecake
Looking for unique ways to serve cherry cheesecake? Try these ideas:
Cherry Cheesecake Bars
- Make cheesecake in a square pan and cut into bars for easy serving.
Cherry Cheesecake Cups
- Layer cheesecake filling and cherry topping in small jars for an elegant individual dessert.
Frozen Cheesecake Bites
- Freeze cheesecake cubes, dip in chocolate, and enjoy them as bite-sized treats.
These ideas put a fun twist on the classic dessert!
Frequently Asked Questions
1. Can I make cherry cheesecake ahead of time?
Yes! Cheesecake tastes even better after chilling overnight, so it’s perfect for making a day or two in advance.
2. How do I prevent cracks in my cheesecake?
Avoid overmixing the batter, use a water bath, and let the cheesecake cool gradually inside the oven.
3. Can I use frozen cherries for the topping?
Absolutely! Just let them thaw slightly and drain any excess liquid before cooking.
4. What can I use instead of graham crackers for the crust?
Crushed Oreos, digestive biscuits, or vanilla wafers make great alternatives.
5. How do I store leftover cheesecake?
Keep it in an airtight container in the fridge for up to 5 days. You can also freeze it for up to 3 months.
6. Can I make a gluten-free version?
Yes! Use gluten-free cookies or almond flour instead of graham crackers for the crust.
These FAQs should help you master making the perfect cherry cheesecake.
Common Mistakes and How to Avoid Them
Even experienced bakers can run into issues when making cherry cheesecake. Here are some common mistakes and how to prevent them:
1. Overmixing the Batter
- Problem: Overmixing adds too much air, leading to a cracked or sunken cheesecake.
- Solution: Mix just until the ingredients are combined. A stand mixer on low speed or a hand mixer with gentle mixing helps.
2. Using Cold Ingredients
- Problem: Cold cream cheese, eggs, and sour cream don’t blend well, leading to lumps in the batter.
- Solution: Let ingredients sit at room temperature for 30 minutes before starting.
3. Skipping the Water Bath
- Problem: A dry, cracked cheesecake.
- Solution: Wrap the springform pan in foil, place it in a roasting pan, and add hot water to the pan before baking.
4. Opening the Oven Door Too Soon
- Problem: A collapsed or sunken cheesecake.
- Solution: Let it bake undisturbed and only check for doneness in the last 5–10 minutes.
5. Rushing the Cooling Process
- Problem: Cracks or a dense texture.
- Solution: Turn off the oven and let the cheesecake cool inside with the door open before refrigerating.
By avoiding these mistakes, you’ll always ensure a silky-smooth and perfect cheesecake.
How to Decorate Cherry Cheesecake
Presentation matters! Here are some ways to make your cherry cheesecake visually stunning:
Classic Look
- Spread the cherry topping evenly over the cheesecake for a simple yet elegant presentation.
Whipped Cream Border
- Pipe whipped cream around the edges using a star tip for a decorative touch.
Chocolate Drizzle
- Drizzle melted dark or white chocolate over the cherry topping for a fancy finish.
Edible Flowers or Fresh Fruit
- Garnish with fresh cherries, raspberries, or edible flowers for a gourmet look.
A beautiful cheesecake makes the experience even more enjoyable!
Nutrition Information
Here’s a rough estimate of the nutritional breakdown per slice (based on 12 servings):
- Calories: ~350
- Protein: ~6g
- Carbohydrates: ~40g
- Fats: ~20g
- Sugars: ~28g
- Fiber: ~1g
Note: These values may vary based on the specific ingredients and portion sizes.
Seasonal and Occasion Variations
Cherry cheesecake is a versatile dessert that can be adapted for different seasons and occasions. Here are some fun variations:
Spring & Summer Version
- Use fresh berries like raspberries, blueberries, or a mix of fruits for a vibrant, refreshing twist.
- Add lemon zest to the cheesecake filling for a bright, citrusy note.
Fall & Winter Version
- Swirl pumpkin puree and spices into the batter for a festive touch.
- Use cranberries instead of cherries for a tart, holiday-inspired topping.
Holiday Variations
- Christmas: Top with crushed peppermint and drizzle with white chocolate.
- Valentine’s Day: Shape the cheesecake into a heart and decorate it with chocolate hearts.
- Thanksgiving: Add a spiced nut crust with cinnamon and pecans.
These variations let you enjoy cherry cheesecake all year, regardless of occasion.
My Recipe Tips
Here are some pro tips to help you achieve the best results:
- Room Temperature Ingredients: Always use room-temperature cream cheese and eggs for a smooth batter.
- Water Bath for Baking: If possible, bake the cheesecake using a water bath to avoid cracks.
- Cooling Gradually: Don’t rush the cooling process—this helps prevent sinking and cracking.
- Chill Overnight: The flavor improves for at least 8 hours before serving.
- Use a Hot Knife to Slice: Run a sharp knife under hot water, wipe dry, and slice for clean edges.
Following these tips will give you the best homemade cherry cheesecake!
Conclusion
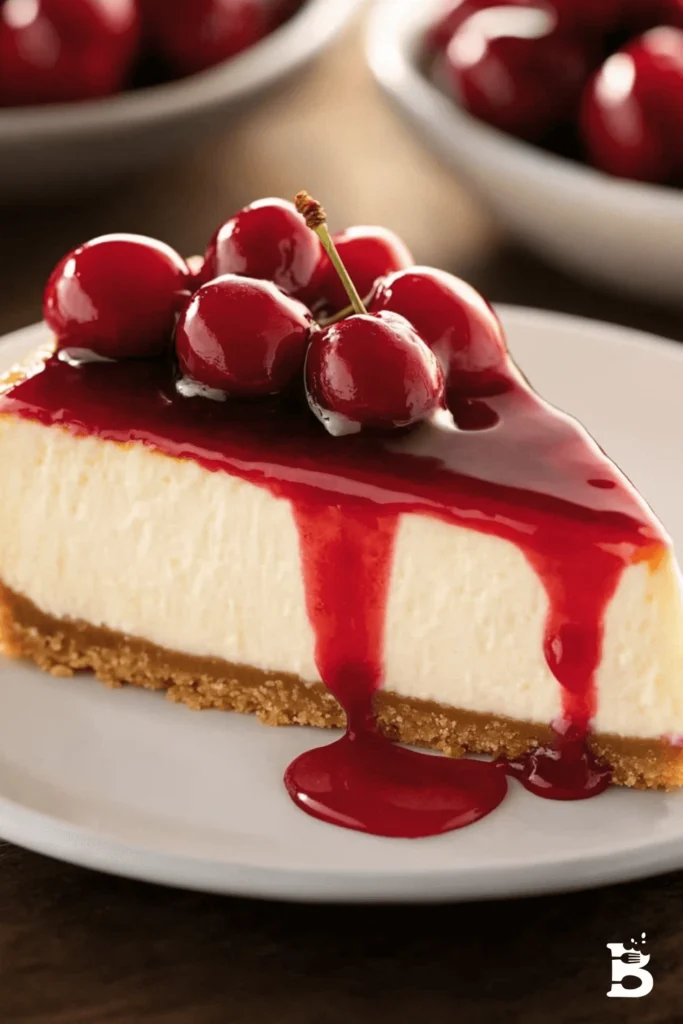
Cherry cheesecake is the perfect blend of creamy, tangy, and sweet flavors. Whether for a special occasion or just to treat yourself, this recipe delivers bakery-quality results at home. Every bite is bliss, from the buttery graham cracker crust to the luscious cherry topping.
Now that you have all the knowledge and expert tips to make the perfect cherry cheesecake, it’s time to get baking! Let us know how it turns out, and don’t forget to experiment with variations and toppings to make it your own. 🍒🍰
🍒 Cherry Cheesecake 🍰🍒
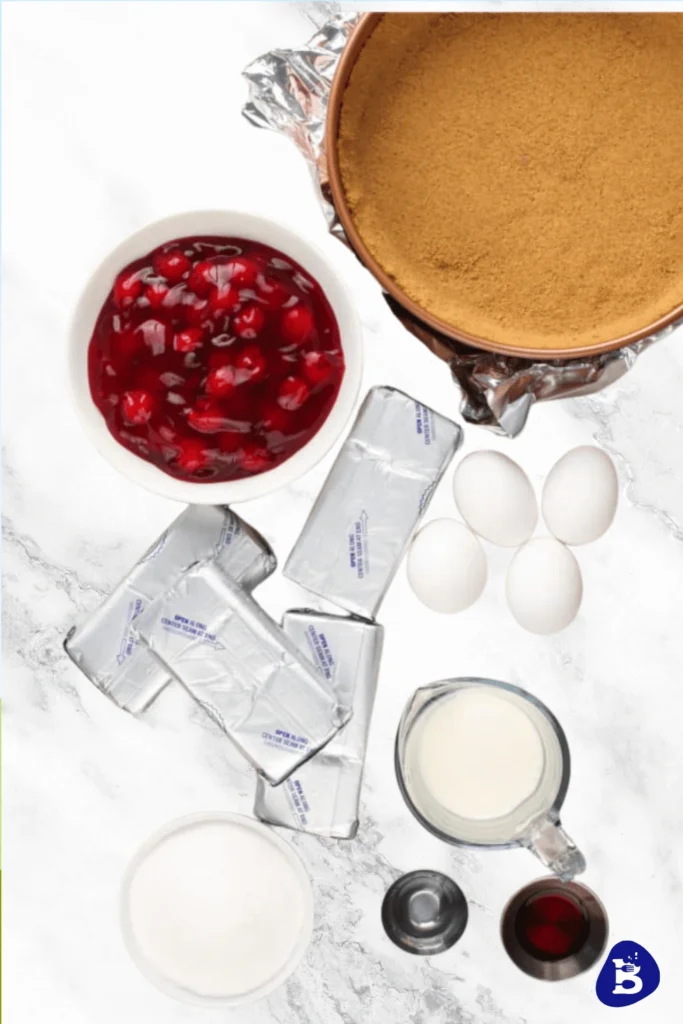
Ingredients
- For the crust:
- 1 ½ cups graham cracker crumbs
- ¼ cup granulated sugar
- 1/3 cup unsalted butter melted,
- 1 teaspoon vanilla extract
- For the cheesecake filling:
- 3 packages 8 oz each cream cheese, softened,
- 1 cup granulated sugar
- 1 teaspoon vanilla extract
- 3 large eggs
- 1 cup sour cream
- 1 tablespoon all-purpose flour
- For the cherry topping:
- 2 cups fresh or canned cherries pitted,
- 1/2 cup cherry juice from canned cherries or fresh,
- 1/4 cup granulated sugar
- 1 tablespoon cornstarch
- 1 tablespoon lemon juice
Instructions
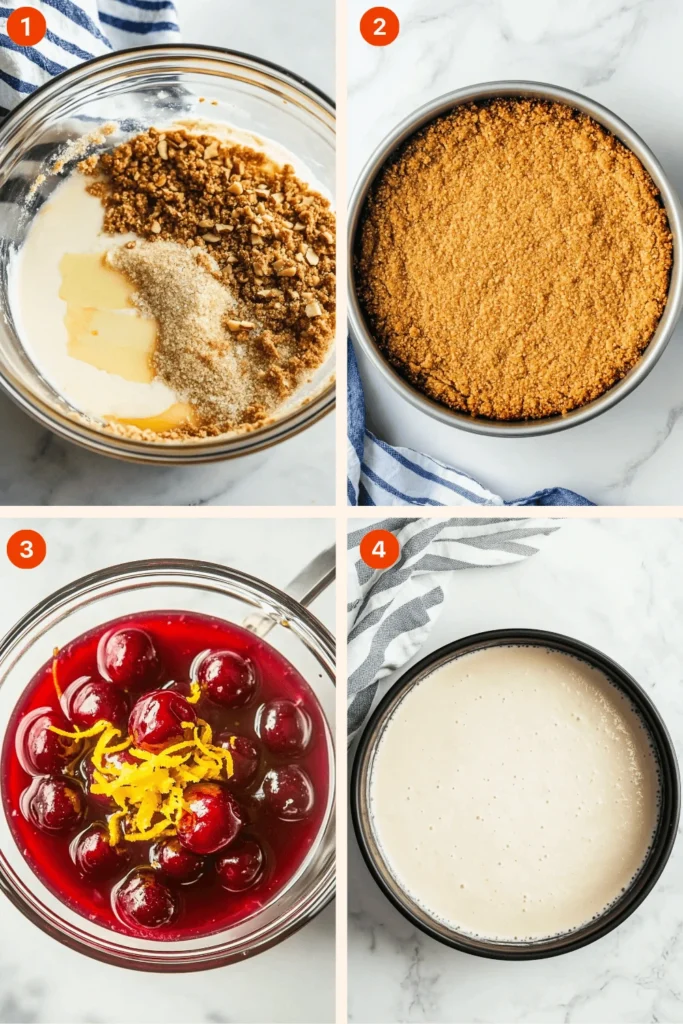
- 1- Make the crust: Preheat your oven to 325°F (160°C).
- 2- In a medium bowl, combine graham cracker crumbs, sugar, melted butter, and vanilla extract. Mix until well combined.
- 3- Press the mixture into the bottom of a greased 9-inch springform pan to form a crust. Bake for 8-10 minutes, or until the crust is golden. Remove from the oven and set aside to cool.
- 4- Prepare the cheesecake filling: In a large bowl, beat the softened cream cheese and sugar together until smooth. Add vanilla extract and eggs one at a time, beating well after each addition. Stir in sour cream and flour until fully combined.
- 5- Pour the cheesecake batter over the cooled crust and spread it evenly.
- 6- Bake at 325°F (160°C) for 55-60 minutes, or until the center is set and slightly jiggles when shaken. Turn off the oven and leave the cheesecake in the oven for 1 hour. Then remove it and cool to room temperature. Refrigerate for at least 4 hours, or overnight for best results.
- 7- Make the cherry topping: In a small saucepan, combine cherries, cherry juice, sugar, cornstarch, and lemon juice. Cook over medium heat, stirring frequently, until the mixture thickens and becomes glossy, about 5-7 minutes. Remove from heat and let it cool to room temperature.
- 8- Once the cheesecake is chilled, pour the cherry topping over the cheesecake.
- 9- Slice and serve chilled. Enjoy your creamy and tangy Cherry Cheesecake!