Pumpkin crunch recipe lovers, you’re in for a treat. Whether it’s fall or Thanksgiving, or you’re just craving something cozy and comforting, this dish delivers a delicious mix of soft, spiced pumpkin filling with a buttery, crispy topping. It’s one of those desserts that gets people talking, asking for the recipe, and coming back for seconds. But what makes this particular version stand out isn’t just the balance of flavors—it’s how ridiculously easy it is to whip up. No fussy pie crusts, no baking degrees needed, just real ingredients and real flavor. If you’ve been searching for a go-to fall dessert that’s simple but unforgettable, this is it.
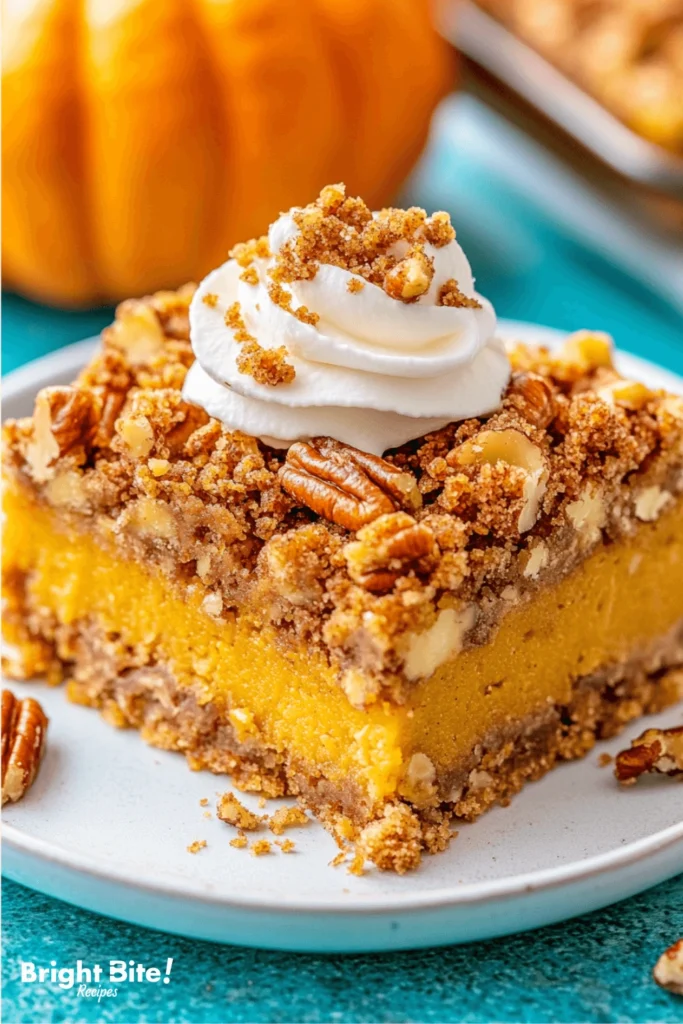
Table of Contents
Why You’ll Love This Recipe
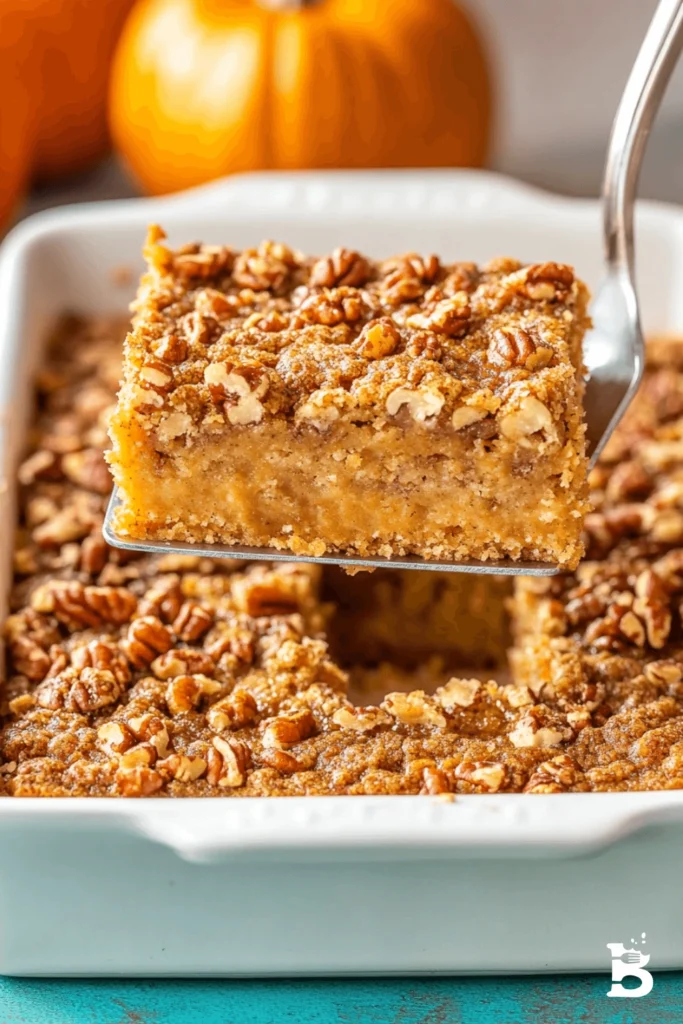
This pumpkin crunch recipe wins on all fronts: it’s straightforward, affordable, and impressively tasty. It’s the type of dessert you can make last minute but still feel proud to serve. The creamy pumpkin base brings all those warm spices we associate with cooler weather—cinnamon, nutmeg, clove—while the topping offers a texture that’s somewhere between a crisp and a cake. Every bite gives you that satisfying contrast: soft meets crunch, sweet meets buttery.
It’s also a crowd-pleaser. Please bring it to a potluck, and it disappears. Bake it for the holidays, and you’ll have relatives raving. Even better? It’s easy to scale up for larger groups. The ingredients are pantry-friendly, and you probably already have most of them. You don’t need to be a seasoned baker to get this one right—just follow a few simple steps, and the oven will take care of the rest.
Detailed Ingredients and Instructions
Let’s break down what goes into this pumpkin crunch recipe, so you know exactly what’s happening in every layer.

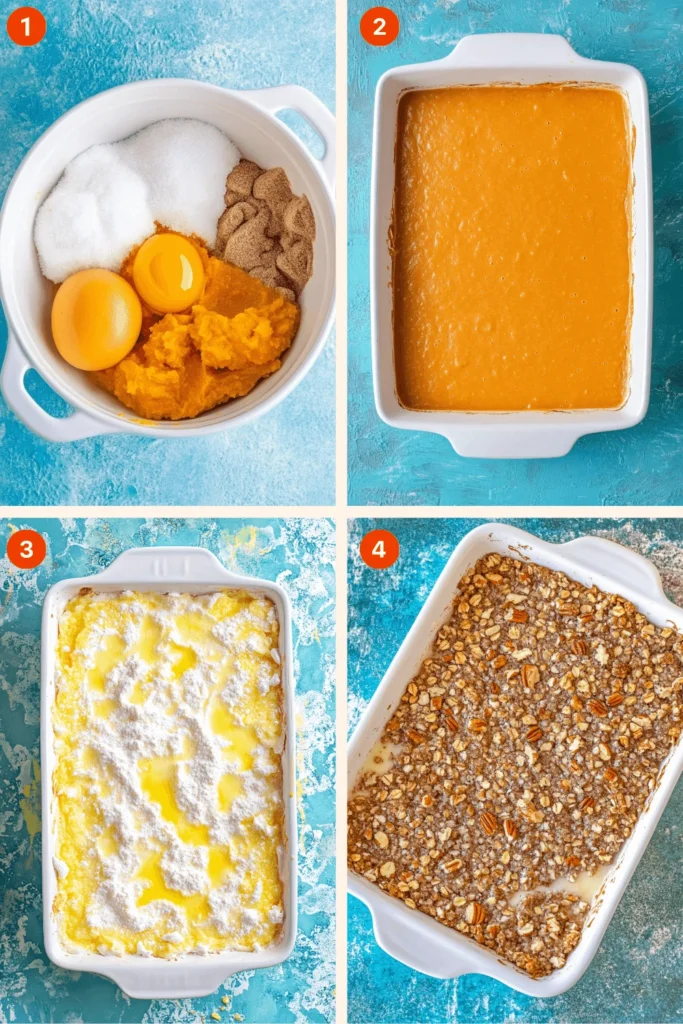
First up is the pumpkin filling. This part is very similar to what you’d find in a traditional pumpkin pie. You’ll be using pure canned pumpkin—not the pre-sweetened pie mix—and mixing it with eggs, sugar, and evaporated milk. The goal is a smooth, custardy texture with warm spice notes that complement rather than overpower. We’ll season it with cinnamon, nutmeg, ginger, and a pinch of clove to round it out.
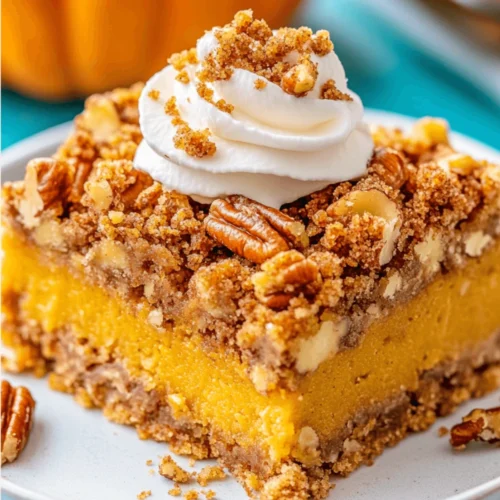
Now for the topping. This is where the “crunch” comes in. Instead of a crust, we’re sprinkling a boxed yellow cake mix right over the pumpkin filling. It might sound odd, but trust the process. The dry cake mix forms the top layer, and when combined with melted butter, it bakes into a golden, crisp topping that’s both tender and crunchy. The contrast in textures is what makes this dish so addictive.
Here’s the step-by-step logic behind the assembly:
- The filling goes into the bottom of the dish. It’s liquidy at first but firms up as it bakes.
- Then comes the cake mix, which isn’t mixed in—it’s scattered across the top so it doesn’t sink into the filling.
- Melted butter is drizzled over the cake mix, soaking into the top layer and creating that crisp crust as it bakes.
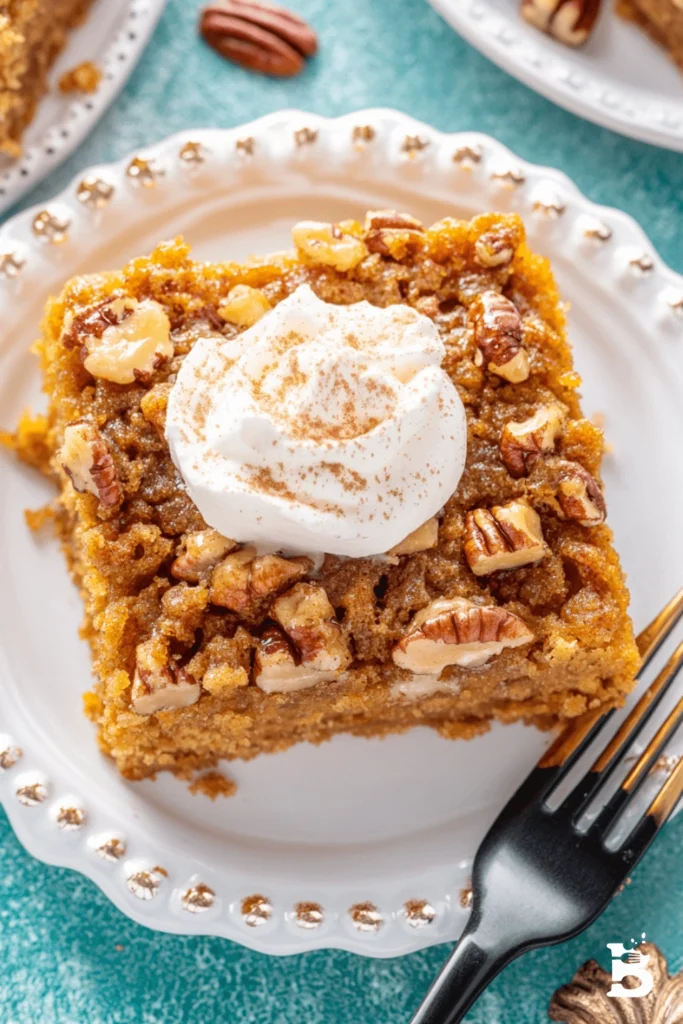
- Some folks like to add chopped pecans or walnuts on top for extra texture. Totally optional, but it’s a nice touch if you like nuts.
The baking time is about an hour, and while it smells amazing coming out of the oven, give it some time to cool. The filling needs to be set up, and the topping gets crispier as it rests. It’s best served at room temperature, though you can also chill it or warm it slightly, depending on how you like your desserts.
Short on time? You can prepare the filling a day ahead and store it in the fridge. When you’re ready to bake, just layer everything and pop it in the oven. It’s flexible enough to fit your schedule, which makes it perfect for busy holiday prep.
Tips, Variations, and Storage Options
Let’s talk about how to make this pumpkin crunch recipe fit your style, your pantry, and your crowd.
Tips for Nailing It Every Time:
Use room-temperature ingredients for smoother mixing. Cold eggs or milk straight from the fridge can lead to uneven blending, especially in custard-style fillings. Also, when spreading the dry cake mix, aim for even coverage. Gaps or clumps can lead to an uneven top, which might not brown the same all over.
Pour the melted butter slowly and evenly. This is a big one. If you just dump it on one spot, you’ll get a soggy, greasy patch instead of a crisp crust. Some people use a spoon to drizzle it; others melt the butter and use a squeeze bottle to distribute it more precisely. Whatever your method, aim for good coverage.
If your oven runs hot or you’re baking in a glass dish, check on your dessert around the 45-minute mark. The top should look golden and crisp but not burnt. Cover loosely with foil if it starts to brown too fast.
Popular Variations:
- Nutty Crunch: Add chopped pecans or walnuts over the cake mix before baking. They toast up beautifully in the oven and bring a roasted, buttery flavor that complements the pumpkin.
- Spiced Cake Mix: Try using a spice cake mix instead of a yellow cake mix. It doubles down on the warm flavor profile and adds another dimension without extra effort.
- Maple Drizzle: After baking and cooling, lightly drizzle maple syrup or a simple glaze made from powdered sugar and milk over the top. Adds a pretty finish and a sweet contrast.
- Cream Cheese Swirl: Soften cream cheese and swirl it gently into the pumpkin filling before baking. It adds tang and creaminess like a cheesecake meets pumpkin pie hybrid.
Storage Options:
Leftovers? Lucky you. Pumpkin crunch stores surprisingly well.
- Refrigerator: Store in an airtight container for up to five days. Let it cool completely before refrigerating so it doesn’t get soggy.
- Freezer: Yep, it freezes fine. Wrap tightly or store in a freezer-safe container for up to two months. Thaw in the fridge overnight, then warm slightly in the oven to bring back some of the crunch.
- Reheating: While you can microwave individual portions, the oven or toaster oven is your best bet for keeping the top crisp. About ten minutes at a low temp should do the trick.
Equipment Needed
This pumpkin crunch recipe is low-effort, and you don’t need fancy gear to pull it off. But here are the essentials that’ll make life easier:
- Mixing Bowls: One for the filling, one for optional toppings or nuts.
- Whisk or Electric Mixer: A whisk is fine, but a handheld mixer makes the filling smoother and faster.
- 9×13 Baking Dish: Glass or ceramic both work. Just avoid anything too shallow—the filling needs room.
- Spatula or Spoon: For mixing and smoothing out the filling.
- Measuring Cups and Spoons: Accuracy matters for the custard layer.
Optional but handy: a silicone spatula to scrape down the mixing bowl and a small spoon
Related Recipes
Love this pumpkin crunch recipe. Here are a few other seasonal favorites that pair beautifully or work as crowd-pleasing alternatives.
- Pumpkin Cheesecake Bars: Creamy, spiced pumpkin meets tangy cheesecake in bar form. Great for make-ahead dessert trays.
- Apple Crisp with Oat Topping: A fall staple with tart apples, warm cinnamon, and a crunchy oat topping. It’s like Pumpkin Crunch’s apple cousin.
- Sweet Potato Casserole with Pecan Crust: If you like the texture combo in pumpkin crunch, you’ll love this rich, spiced side dish that doubles as dessert.
- Maple Pecan Pie Bars: Sticky, sweet, and nutty. Perfect if you’re craving something gooey and crunchy at the same time.
- Cinnamon Roll Bread Pudding: Comfort food to the max. Soft, custardy, and full of cinnamon flavor. Add a glaze drizzle, and you’ll be in business.
These recipes all bring that cozy, fall dessert energy and can be mixed and matched depending on the occasion. Whether you’re planning a Thanksgiving spread or just a weekend bake, these make great companions to your pumpkin crunch recipe.
Frequently Asked Questions
Can I use fresh pumpkin instead of canned?
Absolutely. Just make sure it’s pure pumpkin puree, not pumpkin pie filling. Roast and mash the pumpkin until smooth, then measure it cup for cup the same way you would with canned. You may need to adjust the moisture slightly depending on the type of pumpkin used—some are wetter than others.
Is it okay to use pumpkin pie mix?
You can, but it changes the flavor and sweetness levels. Pumpkin pie mix already has sugar and spices, so if you go this route, reduce the added sugar and skip the spices in the filling. Still, using pure canned pumpkins gives you better control over the final taste.
What if I don’t have a cake mix?
While yellow cake mix is a key part of this pumpkin crunch recipe, you can make a homemade alternative by combining flour, sugar, baking powder, and a bit of salt. It won’t be an exact match, but it gets you close enough if you’re in a pinch.
How do I know when it’s done baking?
The top should be golden brown and feel crisp to the touch. The center of the filling will still jiggle slightly but should not be liquid. A knife inserted should come out mostly clean with a few moist crumbs.
Can I make this dairy-free or gluten-free?
Yes, to both. For dairy-free, swap the evaporated milk with coconut milk or almond milk. Use plant-based butter alternatives for the topping. For gluten-free, choose a gluten-free yellow cake mix and double-check all other ingredients. It may alter the texture slightly, but the flavor holds strong.
Can I make it ahead of time?
Yes. This dessert actually improves with time as the flavors deepen. You can bake it the day before and store it covered in the fridge. Let it come to room temp before serving, or gently reheat for that just-baked feeling.
How do I serve it cleanly?
Use a flat spatula and scoop straight down, lifting from the bottom to keep the layers intact. Wipe the spatula between servings for cleaner cuts. If presentation matters (like for a holiday dinner), allow it to cool completely before cutting—it sets better that way.
Nutrition Information
While this isn’t a diet dessert, it’s good to know what you’re getting in each serving of this pumpkin crunch recipe. Nutritional values can vary depending on specific brands and portions, but here’s a general breakdown based on twelve servings:
- Calories: Around 300 per serving
- Total Fat: 14 grams
- Saturated Fat: 7 grams
- Carbohydrates: 40 grams
- Sugar: 26 grams
- Protein: 3 grams
- Fiber: 1 gram
You can reduce the sugar slightly if needed or use a lower-fat milk alternative to adjust the calorie content. But keep in mind, this is meant to be a treat—one that satisfies both the sweet tooth and the craving for something rich and comforting.
Seasonal and Occasion Variations
What’s great about the pumpkin crunch recipe is that it’s easy to tweak depending on the occasion. With a few small changes, you can make it feel custom-made for holidays, parties, or even just a cozy weekend.
- For Thanksgiving: Serve in a large, decorative baking dish and garnish with roasted pecans or a dusting of powdered sugar. You can even pre-cut it into squares and top each one with a dollop of whipped cream or a drizzle of caramel sauce.
- For Christmas: Add a splash of vanilla or almond extract to the filling and top with crushed gingersnaps mixed into the cake mix layer. It adds festive flair and a bit of spice to match the holiday mood.
- For Halloween Parties: Bake them in individual muffin cups instead of a large dish. This turns them into pumpkin crunch “bites,” easy to grab and eat with fingers. You can even decorate the tops with orange sprinkles or candy eyes for a playful twist.
- For Potlucks or Picnics: Bake in a disposable aluminum pan for easy transport. Add a tub of whipped topping just before serving. It travels well and can be served cold or at room temperature.
- For Birthdays or Casual Gatherings: Layer with chocolate chips before baking to make it feel a bit more decadent and cake-like. This adds texture and a flavor contrast that chocolate fans will love.
With every variation, the heart of the dish—the pumpkin base and crunchy top—stays the same. It’s what makes this dessert so adaptable and so reliable.
My Recipe Tips
After making this pumpkin crunch recipe more times than I can count, here are the tips I keep coming back to. These are the small, game-changing moves that elevate your dessert from “good” to “gone in minutes.”
- Don’t skip the spice balance: A lot of pumpkin desserts get heavy-handed with cinnamon or clove. The trick is layering the spices just enough to enhance the pumpkin without overpowering it. A little clove goes a long way, and too much nutmeg can turn bitter. Taste the mix before baking if you’re unsure.
- Resist the urge to stir the cake mix: One of the most common mistakes is mixing the cake mix into the filling. Could you not do it? The dry cake mix sits on top for a reason—it’s what creates that crumbly, crisp finish. Stirring it in will leave you with a weird, mushy layer, and you’ll lose the crunch that defines the dish.
- Don’t skimp on the butter: This isn’t the time to go light. The butter doesn’t just add richness; it’s the key to transforming the dry cake mix into that crisp topping. You need enough to soak through the surface and create those golden pockets of crunch. If you’re trying to lighten the dish, consider cutting sugar elsewhere—but keep the butter where it counts.
- Cool it properly before serving: Letting the dish cool gives the filling time to set. Serve it too soon, and it might come out more like pumpkin soup with cake bits on top. It doesn’t need to be chilled, but it does need a good 30 to 60 minutes to firm up. For clean slices or squares, cooling is essential.
- Make it your signature: Once you’ve got the basic recipe down, start tweaking it until it feels like yours. Add a swirl of nut butter, toss in white chocolate chips, or spike the filling with a bit of bourbon for depth. The base is so solid that you can riff on it in tons of directions.
Conclusion
The beauty of this pumpkin crunch recipe is its balance—between soft and crisp, simple and satisfying, nostalgic and adaptable. It’s the kind of dessert you make once and then keep coming back to because it checks every box: easy, flavorful, and memorable. Whether you’re pulling it out for a holiday crowd or just craving something cozy on a rainy weekend, it delivers.
What makes it so special isn’t just the taste (though that’s hard to beat)—it’s the feeling. It smells like fall, tastes like comfort, and serves like a winner. You don’t need fancy skills or obscure ingredients to make it shine. Just a few kitchen basics, a love for pumpkin, and a willingness to share—though no one will blame you if you keep a little slice tucked away for later.
If you’re hungry for more cozy, crowd-pleasing dishes like this one, check out some of the related recipes mentioned earlier. Or better yet, bookmark this one because once you try it, it’s bound to become a regular in your dessert rotation.
🎃 Pumpkin Crunch Recipe 🍰🍂
Ingredients
- Pumpkin base:
- 1 can 15 oz pumpkin purée
- 1 can 12 oz evaporated milk
- 3 large eggs
- 1 cup granulated sugar
- 1 teaspoon ground cinnamon
- 1/2 teaspoon ground nutmeg
- 1/2 teaspoon salt
- Crunch topping:
- 1 box yellow cake mix 15.25 oz
- 1 cup chopped pecans
- 1 cup unsalted butter melted
- Optional toppings:
- Whipped cream
- Vanilla ice cream
- Caramel sauce
Instructions
- Preheat oven: Set your oven to 350°F (175°C). Grease a 9×13-inch baking dish.
- Mix the pumpkin base: In a large bowl, whisk together pumpkin purée, evaporated milk, eggs, sugar, cinnamon, nutmeg, and salt. Pour this mixture into the prepared baking dish.
- Add the topping: Sprinkle the dry yellow cake mix evenly over the pumpkin layer. Do not stir. Top with chopped pecans.
- Drizzle with butter: Slowly pour the melted butter over the top, covering as much of the cake mix as possible.
- Bake: Bake for 50–55 minutes, or until the top is golden and a toothpick inserted into the center comes out clean.
- Cool and serve: Let it cool for 15–20 minutes before serving. Add whipped cream, ice cream, or caramel sauce if desired.